Kategorie: Leitfäden

Learn about eazyBackup through our documentation and start running backups!

Storage Vault Usage Report

Using the online Control Panel, it is possible to get a detailed report of data usage in your storage vault(s).

  1. Login to the eazyBackup Control Panel: https://panel.eazybackup.ca/
  2. Click on 'Storage Vaults' from the left side menu.
  3. You will see a list of your storage vaults on this page. Click the link in the 'Stored' size column to open the report.
  4. The report will display data that belongs to current backups, data held in retention by retention policies, and data from 'unknown' items. 'Unknown' items are Protected Items that have been deleted, but the data has not yet expired based on the retention policy set on your storage vault.
  5. Reports can be exported to the Clipboard as a CSV or Excel file.


Hyper-V Virtual Machine Backup Walkthrough

The Hyper-V Protected Item will help you perform backups of Hyper-V geust virtual machines on Windows Server.

The underlying technology is microsoft VSS and is compatible with all versions of Hyper-V running on Windows Server, including Windows Server 2022 (the latest version at the time of writing).

This backup type is only applicable when running on Windows Server. Hyper-V on Windows Desktop is not supported by this Protected Item type.

eazyBackup ist mit dem Hyper-V VSS Writer integriert, um einen Hyper-V Backup-Snapshot zu erstellen, einschließlich der Unterstützung für In-VM-Quiescence auf unterstützten Gastbetriebssystemen.

Das Sichern einer virtuellen Hyper-V-Maschine mit eazyBackup beinhaltet, ist aber nicht beschränkt auf:

  • seine Konfigurationsdatei
  • alle angeschlossenen virtuellen Laufwerke
  • den Inhalt des Arbeitsspeichers (wenn der Rechner in Betrieb war)
  • den gesamten Baum der gespeicherten Kontrollpunkte

You can select individual virtual machines for backup, or choose “All virtual machines”.


Add New Protected Item:


Select Microsoft Hyper-V backup type and give the Protected Item a name:


Select VMs for backup by clicking the + button:


Select all Virtual Machines or individual VMs for backup:


The Item selection window shows you which VMs you have selected for backup - Click Next:


Create a new schedule, click the + button to create the schedule:


You can name the schedule:


Select the Time tab, click the + button to add scheduled run times:


Set your start time, then cllick OK and Next:


Default retention is 30 Backup Jobs, you can modify the retention settings here  to suite your requirements:


Click Finish to Save the Protected Item:


Kroll Pharmacy Management Database Backup

We reccomend performing a daily backup of the Kroll database. Start the backup after business hours to ensure all patient data is included in the daily backup.

We suggest that in addition to the Kroll data, you backup all of the files on your server with our File/ Folder Protected Item. You can also perform a Disk Image backup in the event that you require a bare metal disaster recovery solution.

At a minimum it is critical that you back up your Kroll database files from the default location C:/KrollWin/Backup folder.

To perform a cloud backup of the Kroll database, you will first need to perform a local backup of the Kroll database using the Kroll windows 10 application. The local database backup can then be backup up by eazyBackup to the cloud.

  • Open Kroll pharmacy software and log in as an administrative user.
  • Click on the File Menu > Configuration > Work Station > This Workstation.
  • In the Station Configuration window, click on the "Backup" tab
  • In the Backup Location, specify a local folder where a copy of the backup can be stored. Make sure you have sufficent free space on the destination drive. The database backups are typcially 40-60GB each and you should have free space to hold at least one weeks worth of local backups.
  • The default backup location is C:/KrollWin/Backup
  • The Kroll application will perform a daily backup to the Backup Location you specified.

Once you have Kroll configured to make a daily backup to the local device, you can configure eazybackup to perform a daily backup of your local files.

Step 2. Schedule eazyBackup to backup the Kroll database export

  • Open the eazybackup desktop application
  • Click Add Protected Item
  • Choose Proted Item type "Files and Folder"
  • Click the Custom tab
  • From the Custom file selection tab, choose the location where you scheduled the daily export of the Dentrix database.
  • Click Next in the Protected Item wizard until you reach the Schedule option. Create a new daily backup schedule for this Protected Item.
  • Remember that your Kroll database export must have completed before eazyBackup can start, allow enough time between when the Kroll application exports a copy of your database and when eazyBackup is scheduled to run.


At a minimum you should backup the following locations with the eazyBackup desktop application. After the backup has complted, we reccomend you preform a full restore so that you fully understand the process of backup and restoring in the event of an emergency.

C:/KrollWin/Backup

C:/KrollWin/Medis

C:/KrollWin/POS

C:/KrollWin/BuddyFill


How to Backup Patterson Eaglesoft Dental Software

We reccomend performing a daily backup of the Eaglesoft database. Start the backup after business hours to ensure all patient data is included in the daily backup.

We suggest that in addition to the Eaglesoft data folder, you backup all of the files on your server with our File / Folder Protected Item. You can also perform a Disk Image backup in the event that you require a bare metal disaster recovery solution. At a minimum it is critical that you back up your Eaglesoft database files from the default location of C:\Eaglesoft\Data\.

The default Data folder paths are:

  • C:\Eaglesoft\Data\Audio
  • C:\Eaglesoft\Data\Images
  • C:\Eaglesoft\Data\Metafile
  • C:\Eaglesoft\Data\Customdraw types
  • C:\Eaglesoft\Data\Documents
  • C:\Eaglesoft\Data\Indicators
  • C:\Eaglesoft\Data\Data2*

Step 1. Make sure that everyone in the office is logged out of the application to ensure the backup process has exclusive access.

Step 2. Schedule the Patterson server engine to stop before the backup is scheduled to start.

  • Use windows Task Scheduler to Start and Stop the Server Engine - See this article for detailed instructions: https://pattersonsupport.custhelp.com/euf/assets/Answers/4868/DB_Automated_Stop_Start_07.26.17.pdf?nointercept/1
  • Open the eazybackup desktop application
  • Click Add Protected Item
  • Choose Proted Item type File / Folder Backup
  • Click the Custom tab
  • From the Custom file selection tab, choose the data location (default is C:\Eaglesoft\Data\)
  • Click Next in the Protected Item wizard until you reach the Schedule option. Create a new daily backup schedule for this Protected Item.
  • Use windows Task Schedulerto start the Patterson Server Engine after the daily backup is complete.

IMPORTANT - You must schedule the shutdown of the Patterson Server Engine before eazyBackup can start, or important files may be missed in your backup. 

After you have completed a successfull backup, perform a restore of the server database. It's important to go through the process of resroting data to familiarize yourself with the process.


How to Backup Dentrix Database to the Cloud

We reccomend performing a daily backup of the Dentrix database. Start the backup after business hours to ensure all patient data is included in the daily backup.

We suggest that in addition to the Dentrix common folder, you backup all of the files on your server with our File/ Folder Protected Item. You can also perform a Disk Image backup in the event that you require a bare metal disaster recovery solution. At a minimum it is critical that you back up your Dentrix database files from the Common folder.

Step 1. Schedule a daily database export from Dentrix:

Export a copy of your live database either manually or automatically. For this step you will need to use the Dentrix Server Administration Utility. In order to back up the active Dentrix database files, the database must be exported to a location where the eazyBackup desktop application can back up a copy of your database.

  • Open this Dentrix Server Administration Utility. This is usually located at C:\Program Files\Dentrix\_ServerAdmin.exe.
  • Click the Export/Restore Database tab
  • Under Scheduled Database Exports, select Enable Scheduled Exports.
  • Configure your scheduled export time
  • Click Update Scheduled Status to save the export schedule.

Step 2. Schedule eazyBackup to backup the Dentrix database export

  • Open the eazybackup desktop application
  • Click Add Protected Item
  • Choose Proted Item type File / Folder Backup
  • Click the Custom tab
  • From the Custom file selection tab, choose the location where you scheduled the daily export of the Dentrix database.
  • Click Next in the Protected Item wizard until you reach the Schedule option. Create a new daily backup schedule for this Protected Item.
  • Remember that your Dentrix database export must have completed before eazyBackup can start, allow enough time between when the Dentrix Server Administration Utility exports a copy of your database and when eazyBackup is scheduled to run.

eazyBackup Control Panel

The control panel will allow you to remotely manage devices that are online and connected to the service. The control panel will allow you to do most things you can do in the desktop application.

  • At the login screen enter your backup account Username and Password.
    • The control panel does not accept an account email address, you must enter a backup account Username.
  • If you are an MSP with multiple backup accounts, login to each acocunt you want to manage one at a time.

You can find your backup account username within the
Kundenbereich von Backup Accounts -> Manage Accounts.


Control Panel for eazyBackup Accounts: https://panel.eazybackup.ca/

Control Panel for OBC Accounts: https://panel.obcbackup.com/

Control Panel Features

  • Create and manage Protected items
  • Configure 2FA
  • Start and Stop Backup Jobs
  • Restore Items (Your can restore to the original device if connected, you cannot download the restore in the browser)
  • Add / remove storage vaults and manage vault retention policies
  • View and export  job logs from the 'Histroy' page.
  • Cancel running jobs from the 'History' page

Control Panel Demo

Disk Image Backup Walkthrough

This is a walkthrough to help you create Disk Image backup.

  • Disk Image backups will deduplicate with other data existing inside your Storage Vault. For example, backing up Files and Folders and performing a Disk Image backup from the same hard drive will deduplicate, and provide you with a valuable storage savings.
  • If you are looking for technical information on the Disk Image backup type, please see this article - Disk Image Sicherung

Add a new Protected Item, select the Disk Image backup type

Disk Image Protected Item
Note: You need to have purchased a backup plan that includes the Disk Image feature in order to create a Disk Image Protected Item.

Select the disk that will be included in the backup

Disk Image Protected Item Partition Selection

After creating a Disk Image backup, if any changes are made to the partition table of that disk, that disk to be recognized differently. You will receive a warning that the drive can no longer be found and you will need to reselect the drive and/or partitions.

Include unused disk sectors for forensic data recovery​

By default unused space from the disk will be excluded from the backup, enabling this option will include any non-indexed and marked-as-deleted files in the free space. This could be used for forensic data recovery, but keep in mind that it will lengthen the backup time.

Microsoft Office 365 Cloud to Cloud Backup für MSP

Nutzen Sie eazyBackup als MSP, um Ihren Endkunden einen "Cloud to Cloud" Office 365 Backup-Service anzubieten.

Schritte zur Einrichtung:

  • Erstellen Sie eine VM auf Azure und installieren Sie eazyBackup auf Ihrer Azure VM
  • Erstellen Sie ein geschütztes Element für jede Office 365-Zielorganisation.

Jede "Cloud-to-Cloud"-Office-365-Organisation, die Sie sichern möchten, wird als geschütztes Objekt und nicht als separates Sicherungskonto dargestellt. Auf diese Weise können Sie die O365-Backups ganz einfach zentral über das Bedienfeld verwalten und Backups und Zeitpläne erstellen/verwalten.

Sie können die CPU- und Speicherressourcen der Worker-VM überwachen und die Ressourcen der Instanz bei Bedarf erhöhen; oder Sie können sich in mehrere Worker-VMs aufteilen.

eazyBackup unterstützt den Versand von Job-Report-E-Mails an verschiedene Empfänger für unterschiedliche geschützte Objekte.

Wiederherstellung von Office 365-Elementen

Dateien für die Wiederherstellung auswählen. Beim Durchsuchen der wiederherzustellenden Dateien werden je nach Art des durchsuchten Objekts unterschiedliche Spalten angezeigt.

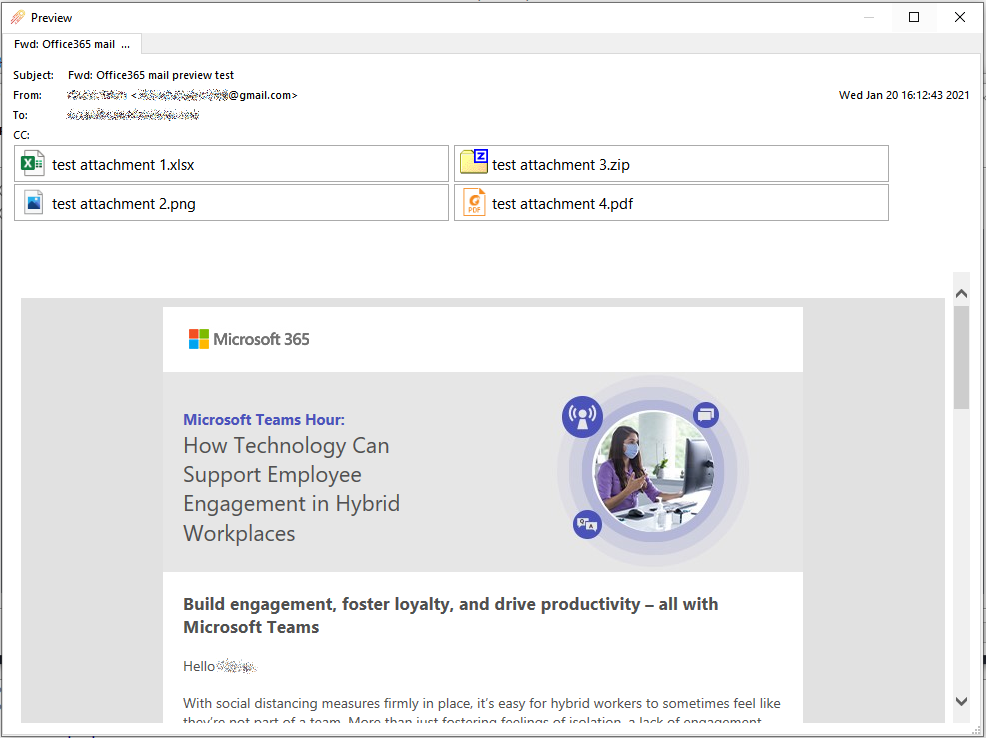
Zeigen Sie eine E-Mail in der Vorschau an, bevor Sie sie wiederherstellen, indem Sie das Rechtsklickmenü verwenden. Die E-Mail-Vorschau zeigt den Rich-HTML-Inhalt an, wenn die E-Mail diesen enthält. Die E-Mail-Vorschau enthält die Kopfzeilenfelder, wie z. B. die Von, Anund Thema Felder, Informationen über angehängte Dateien und eingebettete Bilder.

Wiederherstellung von Office 365-Elementen auf dem lokalen PC

E-Mails werden im MIME-Format wiederhergestellt (*.eml). Diese Dateien können mit Microsoft Outlook auf Ihrem PC oder in jedem anderen E-Mail-Programm (MUA) wie Mozilla Thunderbird geöffnet werden. Microsoft Outlook unterstützt den Import von *.eml Dateien durch Ziehen und Ablegen in einen Outlook-Ordner.

Wenn es sich bei der E-Mail um eine Besprechungseinladung handelt, enthält die E-Mail einen Kalendertermin-Anhang im vCalendar-Format. Diese Anhänge können umbenannt werden in *.vcf und mit Microsoft Outlook auf Ihrem PC geöffnet.

Kontakte und Kalender werden im JSON-Format wiederhergestellt. Diese Dateien müssen weiterverarbeitet werden, um sie in das Standardformat von vCalendar (*.vcf) vor dem Öffnen mit Microsoft Outlook.

SharePoint-Dateianhänge, einschließlich OneDrive-Elemente und Teams-Dateien, befinden sich innerhalb der zugehörigen SharePoint-Website. OneDrive-Dateien können als reguläre Dateien und Ordner unterhalb des Unterverzeichnisses "Dokumente" der zugehörigen SharePoint-Website wiederhergestellt werden.

Wiederherstellung von Office 365-Elementen in der Cloud

Sie können wählen, ob Sie Office 365-Elemente in der Cloud wiederherstellen möchten. Sie können entweder den ursprünglichen Speicherort in der Office 365-Cloud oder einen benutzerdefinierten Speicherort wiederherstellen.

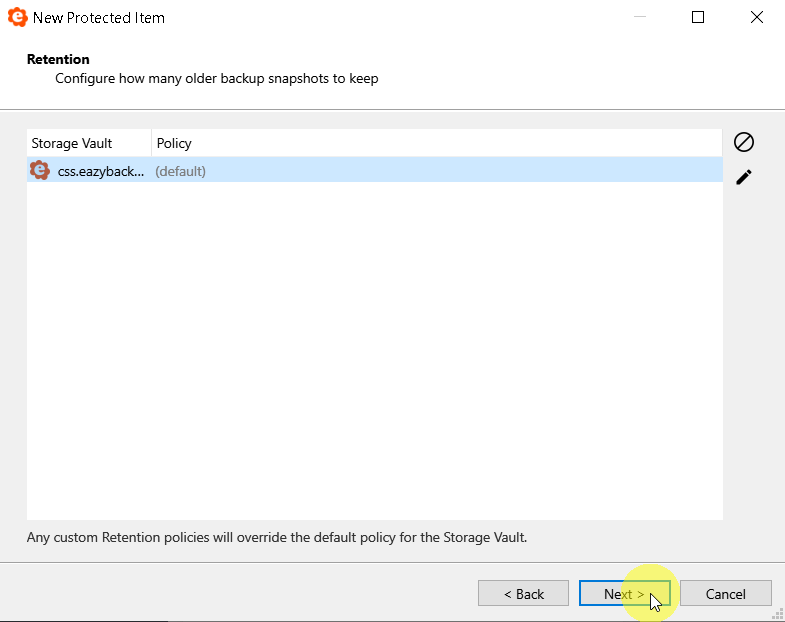
Alle Objekte werden mit der Standardaufbewahrungsrichtlinie wiederhergestellt.

Vorhandene E-Mails werden nicht überschrieben. Wenn eine für die Wiederherstellung ausgewählte E-Mail bereits im Ziel-Office 365-Cloud-Speicherort vorhanden ist, wird sie als E-Mail-Duplikat wiederhergestellt.

Microsoft Office 365 Sicherungsanleitung

Der Typ "Microsoft Office 365" Protected Item ermöglicht es Ihnen, Daten aus Ihrem Office 365 Cloud-Konto zu sichern. Der Sicherungsauftrag wird auf einem lokalen Gerät ausgeführt und nutzt die clientseitige Verschlüsselung, Komprimierung und Deduplizierung von eazyBackup, um Daten effizient zu speichern.

Die folgenden Office 365-Dienste werden unterstützt:

  • Online austauschen
    • Mailbox (E-Mail)
    • Kalender
    • Kontakte
  • Standorte
    • SharePoint
    • OneDrive für Unternehmen
    • Teams Dateien

HINWEIS: Microsoft Online Services sind für die Verfügbarkeit des Office 365-Onlinedienstes und die Einhaltung ihrer SLA-Garantien verantwortlich. Es gibt Archivierungs- und Verlaufslösungen für Erstanbieter wie Retention Policy und Litigation Hold. Sichern Sie Ihr Office 365-Cloud-Konto aus Gründen der Datensicherheit, der Redundanz, der Widerstandsfähigkeit gegenüber Manipulationen, Fehlkonfigurationen und versehentlichem Verlust, der Einhaltung gesetzlicher Vorschriften, der einheitlichen Berichterstattung mit anderen Sicherungsquellen und der einfachen Wiederherstellung einzelner Elemente.

Office 365 Dienstleistungen

Dienstleistungen Sicherung Wiederherstellen auf Lokal Wiederherstellung in der Cloud Unterstützt Nicht unterstützt
Online austauschen
Mailbox (E-Mail) Ja Ja Ja Aktive Benutzer, gemeinsame Postfächer Gastbenutzer, gelöschte Benutzer, Entdeckungspostfach, Archivpostfach, Journal-Postfach, Outlook-Gruppenpostfächer
Kalender Ja Ja Ja Wiederherstellung im Format local:JSON
Kontakte Ja Ja Ja Wiederherstellung im Format local:JSON
Aufgaben Nein Nein Nein
SharePoint Online
Standorte Ja Ja Nein Listen, Dokumente und Seiten einzeln wiederherstellen
Verzeichnisse Ja Ja Ja
Seiten Ja Ja Nein
OneDrive für Unternehmen
Dokumentenbibliothek (Word, Excel, PowerPoint, OneNote) Ja Ja Ja Wird unter "Dokumente" auf der zugehörigen SharePoint-Website angezeigt
Mannschaften
Dateien Ja Ja Ja Wird unter "Dokumente" auf der zugehörigen SharePoint-Website angezeigt
Chat Nein Nein Nein
Kalender Nein Nein Nein
Sitzungen Nein Nein Nein
Rufen Sie an. Nein Nein Nein

Authentifizierung

Geben Sie eazyBackup für Backups die Möglichkeit, Daten aus Ihrem Office 365-Konto zu lesen. Bitte achten Sie auf die angegebenen Anmeldeinformationen, da ein erheblicher Teil des Zugriffs auf die Office 365 Organisation erfolgt. Diese Berechtigung wird durch die Erstellung einer "Anwendung" in Azure AD erteilt. Diese Anwendung kann automatisch oder manuell erstellt werden.

Automatische Antragsregistrierung

Klicken Sie auf die Schaltfläche "Azure Active Directory". Daraufhin wird ein Dialog des Registrierungsassistenten geöffnet, der Sie schrittweise durch den Prozess der automatischen Registrierung führt. Authentifizieren Sie sich mit Azure als Top-Level

Manuelle Antragsregistrierung

Wenn Sie die automatische Anwendungsregistrierung nicht nutzen können, können Sie die Anwendung manuell über die Azure AD-Webschnittstelle mit den folgenden Schritten registrieren:

  1. Registrieren Sie eine gebrandete Anwendung im Azure Active Directory-Panel:

    • Klicken Sie auf "App-Registrierungen" > "Neue Registrierung".
    • Geben Sie einen Anwendungsnamen ein (z. B. "eazyBackup"). Die anderen Optionen können als Standard belassen werden
    • Klicken Sie auf die Schaltfläche "Registrieren".
    • Kopieren Sie die Anwendung (Client) ID Feld in eazyBackup's ID der Anwendung Feld
    • Kopieren Sie die Verzeichnis (Mieter) ID Feld in eazyBackup's Mieter-ID Feld
      • Stellen Sie sicher, dass das Feld nach der Mieter-ID keine zusätzlichen Leerzeichen enthält.
  • Registrieren Sie ein Authentifizierungsgeheimnis für die Anwendung:

    • Klicken Sie auf die Registerkarte "Zertifikate & Geheimnisse" auf der linken Seite
    • Klicken Sie im Abschnitt "Kundengeheimnisse" auf die Schaltfläche "Neues Kundengeheimnis".
    • Ein neues Geheimnis erstellen
      • Geben Sie einen beliebigen Namen (z. B. "eazyBackup credentials") und eine beliebige Gültigkeitsdauer (z. B. "Für immer / Keine Gültigkeitsdauer") an.
    • Kopieren Sie die Wert Spalte in eazyBackup's Anmeldung Geheimnis Feld
  • Erteilen Sie dieser Anwendung die Berechtigung, Office 365-Daten zu lesen:
    • Klicken Sie auf die Registerkarte "API-Berechtigungen" auf der linken Seite
    • Klicken Sie auf die Schaltfläche "Eine Berechtigung hinzufügen".

Suchen Sie die folgenden Berechtigungen und fügen Sie diese hinzu:

  • "Von meiner Organisation verwendete APIs" > "Office 365 Exchange Online" > Anwendungsberechtigungen > ...
    • "Andere Berechtigungen" > voll_zugriff_als_app
  • "Microsoft APIs" > "Microsoft Graph" > Anwendungsberechtigungen > ...
    • Anwendung.Lesen.Alle
    • Calendars.Read
    • ChannelMessage.Read.All
    • Kontakte.Lesen
    • Verzeichnis.Lesen.Alle
    • Dateien.Lesen.Alle
    • Files.ReadWrite.All
    • Gruppe.Lesen.Alle
    • GroupMember.Read.All
    • Mail.Lesen
    • Notizen.Lesen.Alle
    • Berichte.Lesen.Alle
    • Sites.FullControl.All
    • Sites.Verwalten.Alle
    • Sites.Lesen.Alle
    • Sites.ReadWrite.All
    • TeamMember.Read.All
    • TeamMember.ReadWrite.All
    • Benutzer.Lesen.Alle

    • Zurück auf der Seite mit den API-Berechtigungen klicken Sie auf die obere Schaltfläche "Admin-Zustimmung für (Name meiner Organisation) erteilen".

Die Authentifizierungsdetails werden in der Desktop-App automatisch ausgefüllt. Verwenden Sie die Schaltfläche "Verbindung testen", um die Office 365-Anmeldedaten zu überprüfen.

Konfigurieren von Auswahlen

eazyBackup unterstützt die Sicherung verschiedener Elemente aus Ihrem Office 365-Konto. Verwenden Sie den Bleistift-Button in der Desktop-App, um zu konfigurieren, welche Postfächer und Websites gesichert werden sollen. Treffen Sie eine separate Auswahl für Postfächer und Websites, indem Sie den Dropdown-Pfeil neben dem Plus-Button verwenden.

Der Benutzer hat die folgenden Optionen für Backups:

  • Sichern Sie alle Postfächer/Seiten
  • Sichern Sie nur die ausgewählten Postfächer/Seiten
  • Sichern Sie alle Postfächer/Seiten außer den ausgewählten

Bei der Auswahl von Benutzern oder Websites für die Sicherung zeigt das erste Dialogfeld Ihre aktuelle Auswahl an. Klicken Sie im ersten Dialogfeld auf die Plus-Schaltfläche, um ein zweites Dialogfeld zu öffnen, in dem Sie Benutzer und Standorte auf dem Office 365-Server suchen können.

Das Suchfeld im zweiten Dialogfeld kann verwendet werden, um schnell nach einem bekannten Benutzer oder Standort zu filtern.

Bei der Auswahl von Benutzern zeigt der Dialog auch Gruppen an (Azure AD Gruppen von Benutzerkonten). Wenn Sie eine Gruppe auswählen, sichert eazyBackup alle Postfächer der Benutzerkonten, die zu dieser Gruppe gehören.

eazyBackup unterstützt Azure AD Gruppen von Benutzerkonten, aber derzeit keine Outlook Gruppen. Wenn sich E-Mail-Nachrichten in einer Outlook-Gruppe befinden, kann eazyBackup diese nicht sichern. Sie können die Outlook-Gruppen über die Sites-Ansicht sehen, aber die Gruppennachrichten werden nicht in den Sites-Backup-Auftrag aufgenommen.

Die einzigen zur Auswahl stehenden Mailboxen sind:

  • Aktive Benutzer (wie im Office 365 Admin Center angezeigt), und
  • Gemeinsame Postfächer (erstellt mit einem Exchange E5-Lizenzplan oder höher).
    • eazyBackup unterstützt das Sichern von Shared Mailboxes. Shared Mailboxes werden für die Zwecke der Abrechnung als eine vollständige separate Mailbox gezählt, unabhängig von der Anzahl der anderen Konten mit Zugriff auf die Shared Mailboxes.

Die Konfiguration des geschützten Objekts ist auch aus der Ferne über die Webschnittstelle des Bedienfelds möglich. Die Fernkonfiguration über das Bedienfeld kann verwendet werden, wenn das Gerät online ist und eine Live-Verbindung zum Dienst besteht.


de_DEDE